Content to be covered:
- What is JavaFX?
- How do you set up JavaFX in your Eclipse? (System Configuration)
- How do you create a JavaFX project in Eclipse?
- JavaFX Components:
- stage
- scene
- pane
- JavaFX Layouts
- Scene builder
- Animations
Watch this video for a hands-on explanation and deeper insights:
Chapters (Clickable):
- What is JavaFX, and how does it differ from AWT/Swing?
- How do you set up JavaFX in your Eclipse?
- How do you create a JavaFX project in Eclipse?
- JavaFX Components and Elements
- JavaFX Animations
- Scene Builder: Build UI using Drag and Drop
- Q&A Session
1. What is JavaFX?
JavaFX is a GUI toolkit for Java used to create rich desktop applications with graphical user interfaces. It’s the successor to Swing and provides modern UI controls, CSS styling, and hardware-accelerated graphics.
- Built by Oracle (open-source as OpenJFX)
- Can be used with FXML (XML for UI design)
- Supports CSS for styling and Scene Builder for drag-and-drop UI creation
1.1 JavaFX vs. Swing/AWT
| Feature | JavaFX | Swing/AWT |
|---|---|---|
| UI Design | Scene graph-based | Component hierarchy |
| Styling | CSS support | Limited styling |
| Layout Design | FXML (declarative) support | Code-based layout |
| Graphics | Built-in 2D/3D and animation | Limited graphics support |
| Media Support | Native audio/video support | External libraries needed |
| Web Integration | WebView (built-in browser) | Minimal web support |
| Performance | GPU-accelerated rendering | CPU-based rendering |
| UI Components | Modern, customizable controls | Traditional, less flexible components |
2. How do you set up JavaFX in your Eclipse?
2.1 Add JavaFX Plugin in Eclipse:
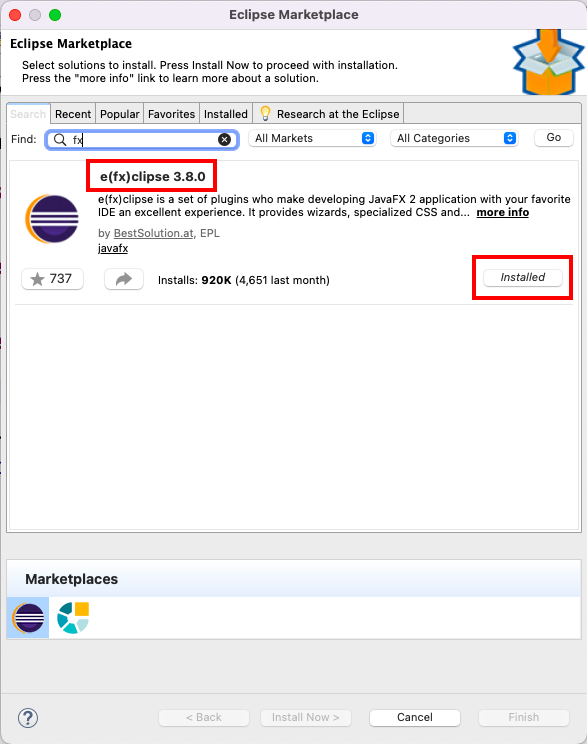
- First, install JavaFX from the Eclipse marketplace and cross-verify if it is installed correctly.
- Search by fx keyword in the Eclipse marketplace
- Post installation, make sure to restart the Eclipse IDE once
- If you fail to install JavaFX using the Eclipse marketplace, then try to install it through Install New Software (In Help)
- Use this link: https://download.eclipse.org/efxclipse/updates-released/3.8.0/site/
- Select all the packages shown on the screen, and then finish the process after the installation is completed
- If it is correctly installed, then you must be able to see the JavaFX project option under File -> New -> JavaFX
2.2 Download JavaFX SDK (External jars):

- Download JavaFX SDK (external jars) according to your system and extract the downloaded file to some place:
- Match your JavaFX SDK version with your JDK or JRE to avoid compatibility issues.
Example: Use JavaFX SDK 17 with JDK 17.
- Match your JavaFX SDK version with your JDK or JRE to avoid compatibility issues.
2.3 Setup Eclipse Runtime Environment:
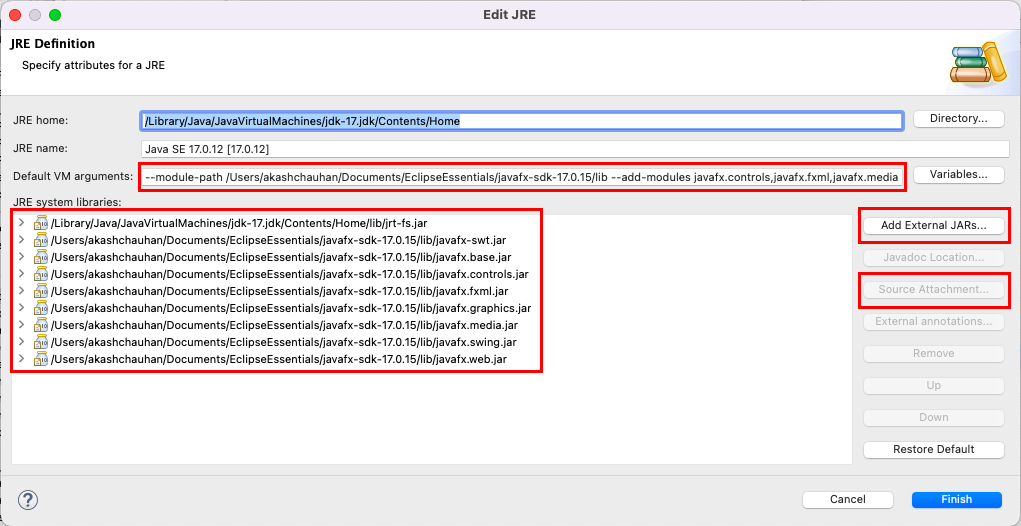
- Add the External Jars (JavaFX SDK)
- Add Source Attachment (src.zip)
- Add Default VM arguments:
– Use path of lib folder inside extracted zip folder
For Mac Users:
--module-path /Users/akashchauhan/Documents/EclipseEssentials/javafx-sdk-17.0.15/lib --add-modules javafx.controls,javafx.fxml,javafx.media
For Windows Users:
--module-path "/Users/akashchauhan/Documents/EclipseEssentials/javafx-sdk-17.0.15/lib" --add-modules javafx.controls,javafx.fxml,javafx.media3. How do you create a JavaFX project in Eclipse?
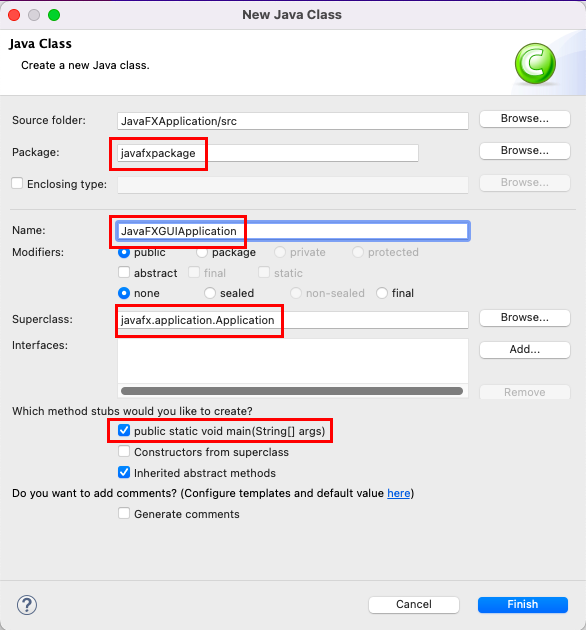
- Create a Simple Java Project (name JavaFXProject)
- Make sure you set the appropriate JRE (Use JDK 17 with JavaFX SDK 17)
- Create a package under src (javafxpackage)
- Create a public class (JavaFXGUIApplication)
- Make sure the public class extends the Application abstract class
- Must define start method (from Application abstract class)
- Make sure to call the launch(args) method (From the main method)
4. JavaFX Application Structure
- A basic JavaFX app extends
Applicationand overrides thestart()method.
- The main method starts the JavaFX application by calling launch(), which internally calls the start() method.
import javafx.application.Application;
import javafx.stage.Stage;

public class JavaFXProject extends Application {

    public static void main(String[] args) {
        launch(args);
    }

    public void start(Stage primaryStage) {
        primaryStage.show();
    }
}
5. JavaFX Components
5.1 Stage:
- The main window (like a JFrame in Swing)
import javafx.application.Application;
import javafx.stage.Stage;

public class JavaFXProject extends Application {

    public static void main(String[] args) {
        launch(args);
    }

    public void start(Stage primaryStage) {
        primaryStage.show();
    }
}
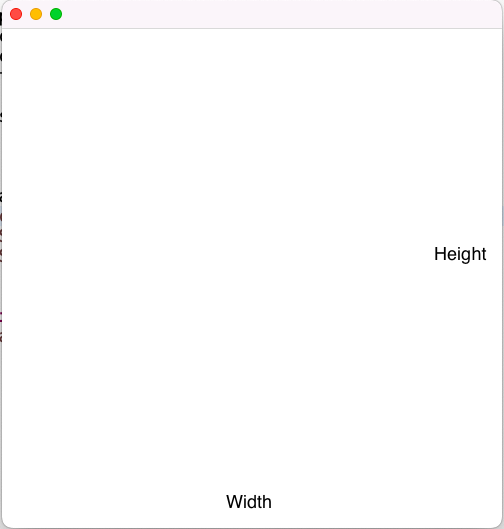
5.2 Scene:
- Container for all JavaFX elements
- Have better control over width and height
import javafx.application.Application;
import javafx.stage.Stage;

public class JavaFXProject extends Application {

    public static void main(String[] args) {
        launch(args);
    }

    public void start(Stage primaryStage) {
        BorderPane root = new BorderPane();//?
        Scene scene = new Scene(root, 500,500);
        primaryStage.setScene(scene);
        primaryStage.show();
    }
}
5.3 Pane and JavaFX Layouts:
- In JavaFX, a
Paneis a base class for all layout containers (likeStackPane,BorderPane, etc.). Layouts are subclasses ofPanethat arrange child nodes in specific ways.- Pane: A base class that can hold child nodes but doesn’t automatically arrange them.
- Layouts: Subclasses of Pane that manage the position and size of child nodes automatically.
Pane pane = new Pane();
Button b = new Button("Click Me");
b.setLayoutX(100);  // Manual positioning
b.setLayoutY(80);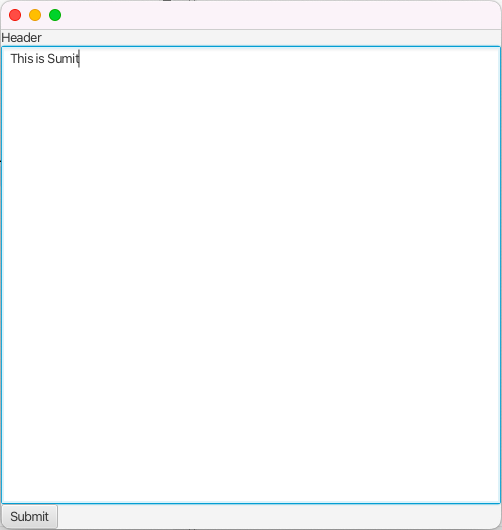
pane.getChildren().add(b);- In JavaFX, there are two main Layout panes, BorderPane and StackPane. They serve very different purposes and organize their child nodes differently.
- BorderPane: Best when you want to place components in fixed positions relative to each other (like a header, footer, sidebars, and main content area).
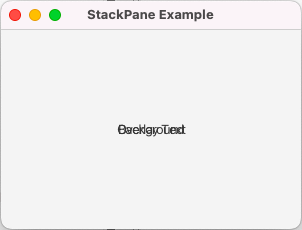
- StackPane: Best when you want to overlay components, like putting a loading spinner over a form or text over an image.
package javafxpackage;
import javafx.application.Application;
import javafx.scene.Scene;
import javafx.scene.control.Button;
import javafx.scene.control.Label;
import javafx.scene.control.TextArea;
import javafx.scene.layout.BorderPane;
import javafx.stage.Stage;
public class JavaFXProject extends Application {
@Override
public void start(Stage primaryStage) throws Exception {
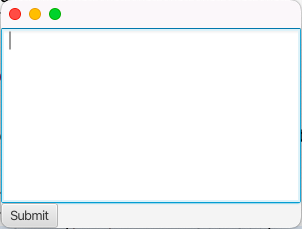
BorderPane borderPane = new BorderPane();
borderPane.setTop(new Label("Header"));
borderPane.setCenter(new TextArea());
borderPane.setBottom(new Button("Submit"));
Scene scene = new Scene(borderPane, 500,500);
primaryStage.setScene(scene);
primaryStage.show();
}
public static void main(String[] args) {
launch(args);
}
}
package javafxpackage;

import javafx.application.Application;
import javafx.scene.Scene;
import javafx.scene.control.Label;
import javafx.scene.layout.StackPane;
import javafx.stage.Stage;

public class JavaFXProject extends Application {

	@Override
	public void start(Stage primaryStage) throws Exception {

        Label backgroundLabel = new Label("Background");
        Label foregroundLabel = new Label("Overlay Text");

        StackPane stackPane = new StackPane();
        stackPane.getChildren().addAll(backgroundLabel, foregroundLabel);

        Scene scene = new Scene(stackPane, 300, 200);
        primaryStage.setTitle("StackPane Example");
        primaryStage.setScene(scene);
        primaryStage.show();

	}

	public static void main(String[] args) {
		launch(args);
	}

}
5.4 Label:
package javafxpackage;
import javafx.application.Application;
import javafx.scene.Scene;
import javafx.scene.control.Label;
import javafx.scene.layout.StackPane;
import javafx.stage.Stage;
public class JavaFXProject extends Application {
@Override
public void start(Stage primaryStage) throws Exception {
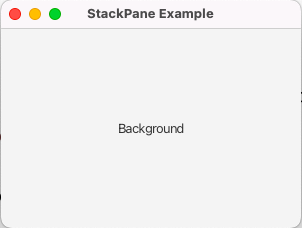
Label backgroundLabel = new Label("Background");
StackPane stackPane = new StackPane();
stackPane.getChildren().addAll(backgroundLabel);
Scene scene = new Scene(stackPane, 300, 200);
primaryStage.setTitle("StackPane Example");
primaryStage.setScene(scene);
primaryStage.show();
}
public static void main(String[] args) {
launch(args);
}
}
5.5 Button:
- A button in JavaFX is created using the
Buttonclass.
package javafxpackage;

import javafx.application.Application;
import javafx.scene.Scene;
import javafx.scene.control.Button;
import javafx.scene.control.TextArea;
import javafx.scene.layout.BorderPane;
import javafx.stage.Stage;

public class JavaFXProject extends Application {

	@Override
	public void start(Stage primaryStage) throws Exception {

		BorderPane borderPane = new BorderPane();
		borderPane.setCenter(new TextArea());
		borderPane.setBottom(new Button("Submit"));
		Scene scene = new Scene(borderPane, 300,200);
		primaryStage.setScene(scene);
		primaryStage.show();

	}

	public static void main(String[] args) {
		launch(args);
	}

}
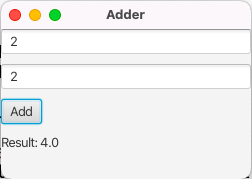
- A program to add two numbers
package javafxpackage;

import javafx.application.Application;
import javafx.scene.Scene;
import javafx.scene.control.Button;
import javafx.scene.control.Label;
import javafx.scene.control.TextField;
import javafx.scene.layout.VBox;
import javafx.stage.Stage;

public class JavaFXProject extends Application {

	@Override
	public void start(Stage primaryStage) throws Exception {

                TextField t1 = new TextField();
                TextField t2 = new TextField();
                Button addBtn = new Button("Add");
                Label result = new Label();

                addBtn.setOnAction(e -> {
                    double a = Double.parseDouble(t1.getText());
                    double b = Double.parseDouble(t2.getText());
                    result.setText("Result: " + (a + b));
                });

                VBox root = new VBox(10, t1, t2, addBtn, result);
                Scene scene = new Scene(root, 250, 150);
                primaryStage.setScene(scene);
                primaryStage.setTitle("Adder");
                primaryStage.show();

	}

	public static void main(String[] args) {
		launch(args);
	}

}
package javafxpackage;

import javafx.application.Application;
import javafx.event.ActionEvent;
import javafx.event.EventHandler;
import javafx.scene.Scene;
import javafx.scene.control.Button;
import javafx.scene.control.Label;
import javafx.scene.control.TextField;
import javafx.scene.layout.VBox;
import javafx.stage.Stage;

public class JavaFXProject extends Application {

	@Override
	public void start(Stage primaryStage) throws Exception {

        TextField t1 = new TextField();
        TextField t2 = new TextField();
        Button addBtn = new Button("Add");
        Label result = new Label();

     // Anonymous EventHandler implementation
        addBtn.setOnAction(new EventHandler<ActionEvent>() {
            @Override
            public void handle(ActionEvent event) {
                try {
                    double a = Double.parseDouble(t1.getText());
                    double b = Double.parseDouble(t2.getText());
                    result.setText("Result: " + (a + b));
                } catch (NumberFormatException e) {
                    result.setText("Please enter valid numbers.");
                }
            }
        });

        VBox root = new VBox(10, t1, t2, addBtn, result);
        Scene scene = new Scene(root, 250, 150);
        primaryStage.setScene(scene);
        primaryStage.setTitle("Adder");
        primaryStage.show();

	}


	public static void main(String[] args) {
		launch(args);
	}

}
- To have specific-sized text fields, you can choose the min and max width concept:
t1.setMaxWidth(100);
t2.setMaxWidth(100);

t1.setMinWidth(30);
t2.setMinWidth(30);
- To make all the components at the center of the stage
//instead of simple
VBox root = new VBox(10, t1, t2, addBtn, result);

//Write this
VBox root = new VBox(10, t1, t2, addBtn, result);
root.setAlignment(Pos.CENTER);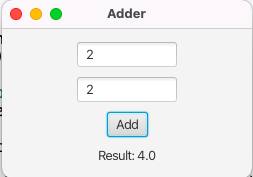
5.6 Scene Builder (FXML UI Design):
Scene Builder is a visual layout tool for designing JavaFX user interfaces using FXML.
It allows developers to drag and drop UI components (like buttons, labels, and text fields) onto a canvas, set their properties easily, and automatically generate the corresponding FXML code. This helps create clean, structured UIs without manually writing layout code, making GUI design faster and more beginner-friendly.
5.6.1 Setup Screen Builder in Eclipse
- Download and Install (JavaFX Scene Builder)

- Now install the .exe/.dmg file
- Add the path of the installed app (~.exe file) in Eclipse Scene Builder

- Now you can create a view.fxml file inside the package under src, and open it in Screen Builder
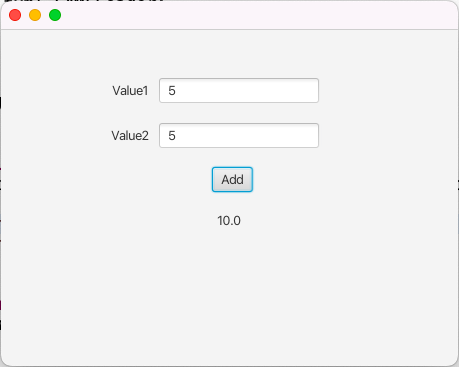
Problem Statement: Create a JavaFX application that takes two inputs from the user and performs an addition operation on those inputs, and shows the result on the stage using JavaFX Scene Builder.
Project structure:
src/
└── javafxpackage/
javafxpackage/
- ├── Main.java
- ├── Controller.java
- └── view.fxml
view.fxml
<?xml version="1.0" encoding="UTF-8"?>

<?import javafx.scene.control.Button?>
<?import javafx.scene.control.Label?>
<?import javafx.scene.control.TextField?>
<?import javafx.scene.layout.Pane?>

<Pane maxHeight="-Infinity" maxWidth="-Infinity" minHeight="-Infinity" minWidth="-Infinity" prefHeight="400.0" prefWidth="600.0" xmlns="http://javafx.com/javafx/23.0.1" xmlns:fx="http://javafx.com/fxml/1" fx:controller="javafxpackage.Controller">
   <children>
      <TextField fx:id="t1" layoutX="158.0" layoutY="49.0" />
      <TextField fx:id="t2" layoutX="158.0" layoutY="94.0" />
      <Label layoutX="111.0" layoutY="53.0" text="Value1" />
      <Label layoutX="110.0" layoutY="98.0" text="Value2" />
      <Button layoutX="211.0" layoutY="138.0" mnemonicParsing="false" onAction="#add" text="Add" />
      <Label fx:id="result" layoutX="216.0" layoutY="183.0" text="Result" />
   </children>
</Pane>
Controller.java
package javafxpackage;

import javafx.event.ActionEvent;
import javafx.fxml.FXML;
import javafx.scene.control.Label;
import javafx.scene.control.TextField;

public class Controller {

	@FXML
	TextField t1;

	@FXML
	TextField t2;

	@FXML
	Label result;

	@FXML
	public void add(ActionEvent e) {

		String s1 = t1.getText();
		String s2 = t1.getText();

		Double data = Double.parseDouble(s1) + Double.parseDouble(s2);
		result.setText(data.toString());

	}

}
JavaFXGUIApplication.java
package javafxpackage;

import javafx.application.Application;
import javafx.fxml.FXMLLoader;
import javafx.scene.Parent;
import javafx.scene.Scene;
import javafx.stage.Stage;

public class JavaFXGUIApplication extends Application {

	@Override
	public void start(Stage primaryStage) throws Exception {
		Parent root = FXMLLoader.load(getClass().getResource("view.fxml"));
		Scene scene = new Scene(root);
		primaryStage.setScene(scene);
		primaryStage.show();
	}

	public static void main(String[] args) {
		launch(args);
	}

}
5.7 JavaFX Animations
JavaFX provides built-in support for creating smooth and interactive animations using classes like TranslateTransition, RotateTransition, ScaleTransition, and FadeTransition. These animations can move, rotate, resize, or change the transparency of UI elements over time. By combining these transitions or using Timeline them for more complex sequences, developers can bring life to JavaFX applications, making them more engaging and dynamic without much code complexity. Animations are especially useful in games, visual effects, and modern GUI applications.
Problem Statement: Create a JavaFX application that visually simulates a ball bouncing back and forth horizontally using basic animation.
package javafxpackage;

import javafx.animation.TranslateTransition;
import javafx.application.Application;
import javafx.scene.Scene;
import javafx.scene.layout.Pane;
import javafx.scene.paint.Color;
import javafx.scene.shape.Circle;
import javafx.stage.Stage;
import javafx.util.Duration;

public class SampleAnimationGUI extends Application {

	@Override
	public void start(Stage stage) throws Exception {

        // Create a circle
        Circle circle = new Circle(50, Color.BLUE);
        circle.setCenterX(50);
        circle.setCenterY(100);

        // Create a pane and add the circle
        Pane pane = new Pane(circle);

        // Create animation
        TranslateTransition animation = new TranslateTransition();
        animation.setNode(circle);
        animation.setDuration(Duration.seconds(2));
        animation.setByX(300); // Move right by 300 pixels
        animation.setCycleCount(TranslateTransition.INDEFINITE);
        animation.setAutoReverse(true); // Move back and forth

        // Start animation
        animation.play();

        // Show scene
        Scene scene = new Scene(pane, 400, 200);
        stage.setTitle("JavaFX Animation");
        stage.setScene(scene);
        stage.show();
	}

	public static void main(String[] args) {
		launch(args);
	}

}
Assignment:
JavaFX Project – Movie Ticket Booking System
Problem Statement:
Create a simple JavaFX-based movie ticket booking system with the following features:
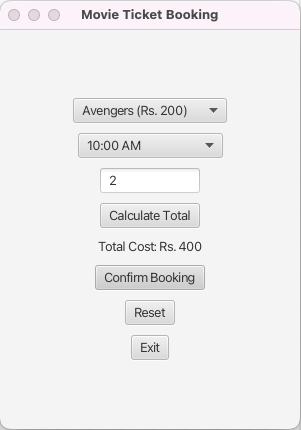
Requirements:
- Movie Selection:
- Allow the user to select a movie from a drop-down list.
- Each movie should have a different ticket price.
Example:- Avengers – Rs. 200
- Frozen – Rs. 150
- Batman – Rs. 180
- Showtime Selection:
- Allow the user to choose a showtime from a dropdown list (e.g., 10:00 AM, 1:00 PM, 6:00 PM).
- Ticket Quantity:
- Let the user enter how many tickets they want to buy.
- Calculate Total Cost:
- Add a button to calculate the total price:
Total Cost = Ticket Price × Number of Tickets - Display the total cost in the UI.
- Add a button to calculate the total price:
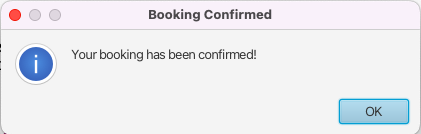
- Confirm Booking:
- Add a button that shows a confirmation message when the user confirms their booking.
- Reset All Fields:
- Add a reset button to clear all selections and inputs so the user can start over.
- Exit Application:
- Add a button to close the application.
package javafxpackage;

import javafx.application.Application;
import javafx.geometry.Pos;
import javafx.scene.Scene;
import javafx.scene.control.Alert;
import javafx.scene.control.Button;
import javafx.scene.control.ComboBox;
import javafx.scene.control.Label;
import javafx.scene.control.TextField;
import javafx.scene.layout.VBox;
import javafx.stage.Stage;

public class MovieTicketBooking extends Application {

	@Override
	public void start(Stage stage) throws Exception {
		// Movie dropdown
        ComboBox<String> movieBox = new ComboBox<>();
        movieBox.getItems().addAll("Avengers (Rs. 200)", "Frozen (Rs. 150)", "Batman (Rs. 180)");
        movieBox.setPromptText("Select Movie");

        // Show time dropdown
        ComboBox<String> timeBox = new ComboBox<>();
        timeBox.getItems().addAll("10:00 AM", "1:00 PM", "6:00 PM");
        timeBox.setPromptText("Select Show Time");

        // Number of tickets
        TextField ticketField = new TextField();
        ticketField.setMinWidth(100);
        ticketField.setMaxWidth(150);
        ticketField.setPromptText("Enter number of tickets");

        // Total cost label
        Label costLabel = new Label("Total Cost: Rs. 0");

        // Buttons
        Button calculateBtn = new Button("Calculate Total");
        Button confirmBtn = new Button("Confirm Booking");
        Button resetBtn = new Button("Reset");
        Button exitBtn = new Button("Exit");

        // Calculate button action
        calculateBtn.setOnAction(e -> {
            String movie = movieBox.getValue();
            String ticketText = ticketField.getText();
            if (movie == null || ticketText.isEmpty()) {
                costLabel.setText("Please select movie and enter ticket count.");
                return;
            }

            int price = 0;
            if (movie.contains("Avengers")) price = 200;
            else if (movie.contains("Frozen")) price = 150;
            else if (movie.contains("Batman")) price = 180;

            int count = Integer.parseInt(ticketText);
            int total = price * count;
            costLabel.setText("Total Cost: Rs. " + total);
        });

        // Confirm button action
        confirmBtn.setOnAction(e -> {
            Alert alert = new Alert(Alert.AlertType.CONFIRMATION);
            alert.setTitle("Booking Confirmed");
//            alert.setHeaderText(null);
            alert.setContentText("Your booking has been confirmed!");
            alert.showAndWait();
        });

        // Reset button action
        resetBtn.setOnAction(e -> {
            movieBox.setValue(null);
            timeBox.setValue(null);
            ticketField.clear();
            costLabel.setText("Total Cost: Rs. 0");
        });

//        EventHandler<ActionEvent> eh4 = new EventHandler<ActionEvent>() {
//
//			@Override
//			public void handle(ActionEvent event) {
//				stage.close();
//			}
//		};
//		exitBtn.setOnAction(eh4);

        // Exit button action
        exitBtn.setOnAction(e -> stage.close());

        // Layout
        VBox root = new VBox(10);
        root.getChildren().addAll(movieBox, timeBox, ticketField, calculateBtn, costLabel, confirmBtn, resetBtn, exitBtn);
        root.setAlignment(Pos.CENTER);
        root.setPrefSize(300, 400);

        // Scene
        Scene scene = new Scene(root);
        stage.setScene(scene);
        stage.setTitle("Movie Ticket Booking");
        stage.show();
	}

	public static void main(String[] args) {
		launch(args);
	}

}
Thank you, with regards.