Content to be covered:
- Introduction to Java GUI Development with AWT & Swing
- Set up your Eclipse to create a GUI project
- How to Create a GUI Frame in Java
- Displaying a Message on a Java GUI Frame
- How to add Multiple Text Labels on a GUI Frame in Java
- How to add a Text Field and an Area on a GUI Frame
- How to add a Button to a Java GUI Application
- Project 1: Basic Calculator
- How to add Checkboxes and Radio Buttons in Java GUI
- Project 2: Interactive Form Using Java Swing
- How to add a JTable in Java Swing
- How to Create a Drop-down Menu and List in Java GUI
- How to add Scrollbars in a Java Swing Application
- Graphics Design using Swing in Java
- Project 3: GUI Graphic Design with Drawing and Styling
- Java Event Handling and Delegation Model Explained
- What Are Adapter Classes in Java Swing?
- Project 4: Mouse Motion-Based GUI Application
Watch this video for a hands-on explanation and deeper insights:
Chapters (Clickable):
- Introduction to AWT/Swing (Java GUI Development)
- Set up your Eclipse to create a GUI project
- How to Create a GUI Frame in Java
- Displaying a Message on a Java GUI Frame
- How to add Multiple Text Labels on a GUI Frame in Java
- How to add a Text Field and Area on a GUI Frame
- How to add a Button to a Java GUI Application
- Project 1: Basic Calculator
- How to add Checkboxes and Radio Buttons in Java GUI
- Project 2: Interactive Form Using Java Swing
- How to add a JTable in Java Swing
- How to Create a Drop-down Menu and List in Java GUI
- How to add Scrollbars in Java Swing Application
- Graphics Design using Swing in Java
- Project 3: GUI Graphic Design with Drawing and Styling
- Java Event Handling and Delegation Model Explained
- What Are Adapter Classes in Java Swing?
- Project 4: Mouse Motion-Based GUI Application
- Q&A Session
What is Swing?
Swing is a Java toolkit used to create graphical user interfaces with platform-independent components. It is part of the Java Foundation Classes and offers customizable elements such as buttons and text fields. Swing supports a pluggable look and feel and follows the Model-View-Controller (MVC) architecture, making it flexible and adaptable for various design needs.
What is AWT?
AWT, or Abstract Window Toolkit, is a Java library for creating graphical user interfaces (GUIs). It includes basic components like buttons and text fields that use the native windowing system, ensuring a platform-specific look and feel. AWT also provides event handling and is the foundation for more advanced Java GUI libraries, such as Swing.
What are the differences between AWT and Swing?
Below are several key differences between Java AWT and Swing.
| S.No | AWT | Swing |
|---|---|---|
| 1 | It is written in C/C++. | It is written in Java. |
| 2 | AWT is heavy-weight. | Swing is lightweight. |
| 3 | AWT is platform-dependent. | Swing is platform-independent. |
| 4 | AWT provides fewer components than Swing. | Swing offers more robust components, such as tables, lists, and scroll panes. |
| 5 | AWT does not follow MVC. | Swing follows MVC. |
How to set the execution environment to create a GUI project in Eclipse?
Follow the given steps in Eclipse IDE.
- First, go to the File option and then create a normal Java project (File -> New -> Java Project).
- Let’s name the project ‘SwingProject‘.
- Now configure the build path:
- To use Swing in Java, you need to have Java 1.7v JRE or above.
- Change the JRE during configuration, or else you will not be able to use the Swing libraries.
- To do this, right-click on the project, navigate to Build Path > Configure Build Path, go to the Libraries tab, and update the JRE if needed.
- Now you can access the javax package in your code. This package contains all the useful swing classes.
- import javax.swing.*;
How to create the first GUI Frame?

setVisible(true);
setSize(500,500);
setLayout(new FlowLayout());
setDefaultCloseOperation(JFrame.EXIT_ON_CLOSE);- First, create a new class (SwingClass) and extend the JFrame class. Also, create a default constructor for this class.
- Create a simple object of this class inside the main method.
- Add these lines to your code and run the code as a Java Application.
To create a GUI application, let’s explore some useful components of AWT and Swing in Java.
1. How to add a message to this GUI Frame?
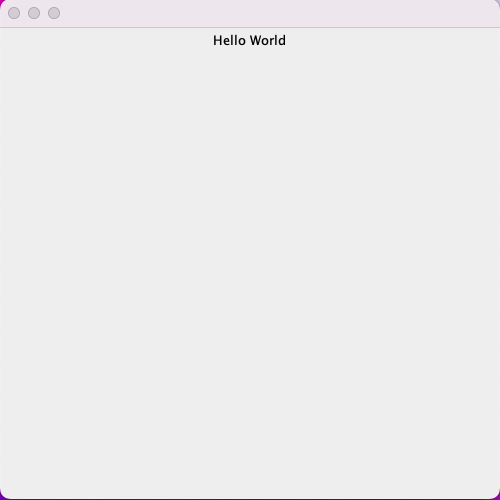
JLabel t1 = new JLabel("Hello World");
add(t1);- JLabel is used to add or show a message on a JFrame.
2. How to add multiple messages on this GUI Frame?

JLabel t1 = new JLabel("Hello World");
add(t1);

JLabel t2 = new JLabel("How are you?");
add(t2);- Multiple JLabels can be used to add or show multiple messages on a JFrame.
3. How to add a text field on this GUI Frame?
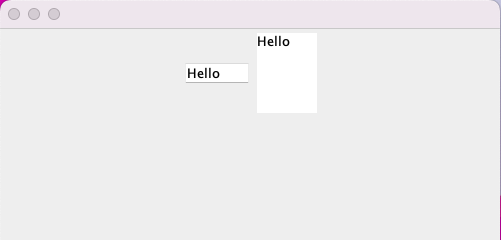
JTextField t3 = new JTextField(5);
add(t3);

JTextArea t4 = new JTextArea(5,5);
add(t4);- JTextField and JTextArea are the two main classes to get the text input from the GUI interface.
- JTextField is used to take single-row data like, int value, names, etc.
- JTextArea is used to take multiple-row data like mail, message, etc.
4. How to add a button on this GUI Frame?
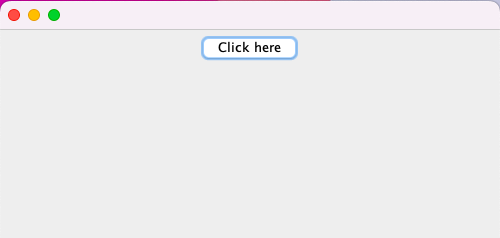
JButton b1 = new JButton("Click here");
add(b1);- JButton is used to create a button on this frame.
PROJECT-1. Create a project, in which you take two inputs from a user and when the user clicks on “+” button the result will be shown on the screen.
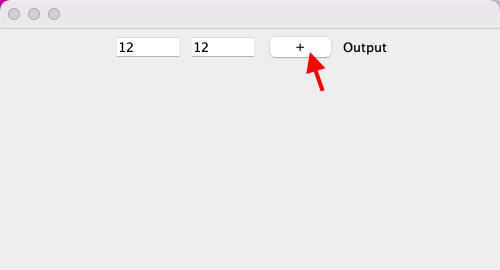
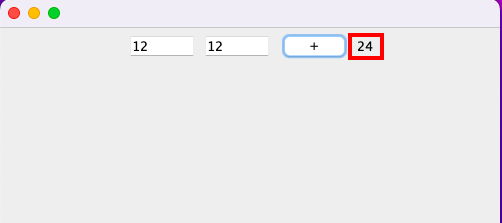
JTextField t1 = new JTextField(5);
JTextField t2 = new JTextField(5);

JButton b1 = new JButton("+");

JLabel l1 = new JLabel("Output");

add(t1);
add(t2);
add(b1);
add(l1);

ActionListener al = new ActionListener() {

	@Override
	public void actionPerformed(ActionEvent e) {

		String s1 = t1.getText();
		String s2 = t2.getText();

		int a = Integer.parseInt(s1);
		int b = Integer.parseInt(s2);

		Integer c = a + b;

		l1.setText(c.toString());

	}
};

b1.addActionListener(al); - Project ideas based on the above concept:
- We can create a GUI app in which the user enters a number on the GUI and clicks on a “Check” button. Your program can calculate the square root of this number and show the result on the GUI.
- We can create a GUI app in which the user enters a number on the GUI and clicks on a “Check” button. Your program can check if the entered number is prime or not and show the result on the GUI.
5. How to add check-boxes and radio buttons on this GUI Frame?
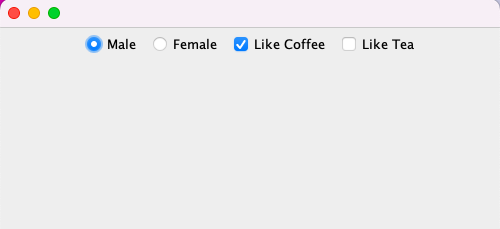
JRadioButton r1 = new JRadioButton("Male");
JRadioButton r2 = new JRadioButton("Female");

JCheckBox c1 = new JCheckBox("Like Coffee");
JCheckBox c2 = new JCheckBox("Like Tea");

add(r1);
add(r2);

add(c1);
add(c2);- JRadioButton and JCheckBox classes are used to create such options for a user.
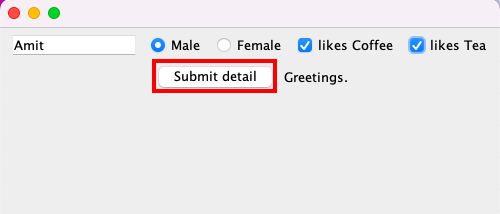
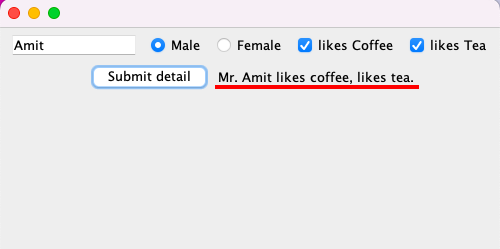
PROJECT-2. Create a project that takes the user’s name as input and provides two radio buttons to select if the user is male or female (ensuring only one can be selected). Additionally, provide two checkboxes to ask if the user likes coffee or tea (both options can be selected). When the user clicks the “Submit Details” button, your application must display a message with all the information, such as “Mr. Amit likes coffee, likes tea.”
JTextField t1 = new JTextField(10);

JRadioButton r1 = new JRadioButton("Male");
JRadioButton r2 = new JRadioButton("Female");

JCheckBox c1 = new JCheckBox("likes Coffee");
JCheckBox c2 = new JCheckBox("likes Tea");

add(t1);

add(r1);
add(r2);

add(c1);
add(c2);

JButton b1 = new JButton("Submit detail");
add(b1);

JLabel l1 = new JLabel("Greetings.");
add(l1);

ButtonGroup bg = new ButtonGroup();
bg.add(r1);
bg.add(r2);

ActionListener al = new ActionListener() {

	public void actionPerformed(ActionEvent e) {

		String name = t1.getText();

		if(r1.isSelected()) {
			name = "Mr. " + name;
		}

		if(r2.isSelected()) {
			name = "Ms. " + name;
		}

		if(c1.isSelected()) {
			name = name + " likes coffee";
		}

		if(c2.isSelected()) {
			name = name + ", likes tea.";
		}

		l1.setText(name);

	}
};

b1.addActionListener(al);
6. How to add a table on this GUI Frame?

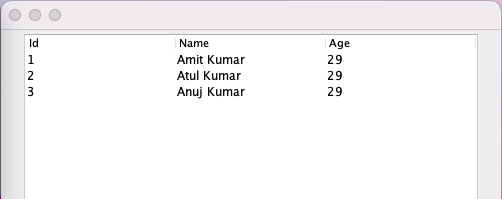
String[] columns = {"Id", "Name", "Age"};
String[][] data = {{"1","Amit Kumar", "29"},{"2","Atul Kumar", "29"},{"3","Anuj Kumar", "29"}};

JTable jt = new JTable(data, columns);
add(jt);

JScrollPane jsp = new JScrollPane(jt);
add(jsp);- JTable class is used to create a table on the GUI, but it does not provide a header row.
- JScrollPane is used to display the JTable properly.
- A JScrollPane manages a viewport, with optional vertical and horizontal scroll bars, as well as optional row and column header viewports.
7. How to add a list of items and a menu list on this GUI Frame?
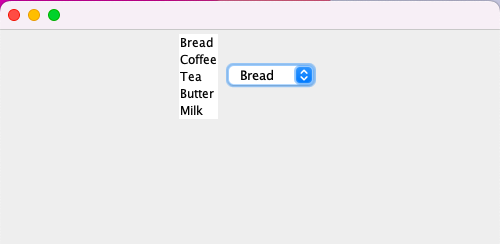
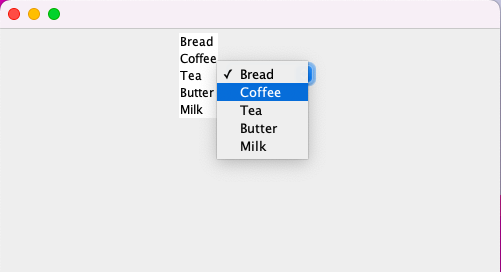
String[] groceryItems = {"Bread", "Coffee", "Tea", "Butter", "Milk"};

JList<String> jl = new JList<>(groceryItems);
add(jl);

JComboBox<String> jcb = new JComboBox<>(groceryItems);
add(jcb);- JList and JComboBox are used to create a list of elements and a menu list, respectively.
8. How to add a scroll bar on this GUI Frame?

JScrollBar jsb = new JScrollBar();
add(jsb);
Graphics Design using Swing in Java
9. How to draw shapes like a rectangle, a circle, an oval shape and an arch on this GUI Frame?
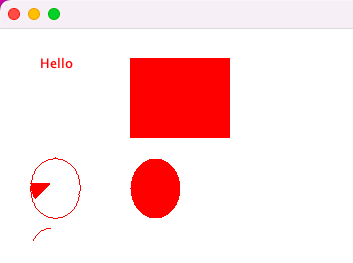
- As we have used JFrame to create a frame window, we have the Canvas class to draw shapes on the frame
- Since we can only extend one class at a time in Java. We have to manage the Canvas class and the JFrame class accordingly.
- JFrame class enables us to add different elements to the frame, including the canvas itself.
- Canvas can enables us to add different shapes on canvas, and later we can add the canvas to the frame window as well.
public class SampleClass extends Canvas {

	public static void main(String args[]) {

		SampleClass obj = new SampleClass();

		JFrame jf = new JFrame();
		jf.add(obj);


		jf.setVisible(true);
		jf.setSize(500, 500);
		jf.setDefaultCloseOperation(JFrame.EXIT_ON_CLOSE);

	}

	public void paint(Graphics g) {

		g.drawString("Hello", 40, 40);
		setBackground(Color.WHITE);
		g.fillRect(130, 30, 100, 80);
		g.drawOval(30, 130, 50, 60);
		setForeground(Color.RED);
		g.fillOval(130, 130, 50, 60);
		g.drawArc(30, 200, 40, 50, 90, 60);
		g.fillArc(30, 130, 40, 50, 180, 40);

	}

}PROJECT-3. Create a GUI project using JFrame and Canvas classes to draw the given figure.
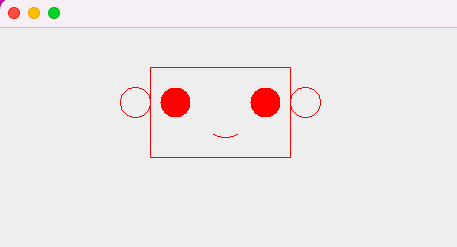
public class SampleClass extends Canvas {

	public static void main(String args[]) {

		SampleClass obj = new SampleClass();

		JFrame jf = new JFrame();
		jf.add(obj);


		jf.setVisible(true);
		jf.setSize(500, 500);
		jf.setDefaultCloseOperation(JFrame.EXIT_ON_CLOSE);

	}

	public void paint(Graphics g) {

		g.drawOval(120, 60, 30, 30);
		g.drawOval(290, 60, 30, 30);

		setForeground(Color.RED);
		g.fillOval(160, 60, 30, 30);
		g.fillOval(250, 60, 30, 30);

		g.drawArc(200, 60, 50, 50, 240, 60);

		g.drawRect(150, 40, 140, 90);

	}

}
10. So, based on what we have learnt so far, can you explain what is Event Handling and what is Event Delegation Model in Java?
10.1 Event Handling:
- An event is the change in the state of an Object or a Source [unclicked ->clicked]
- Even Handling is the mechanism that controls the event and decides what should happen if an event occurs.
10.2 Event Delegation Model:
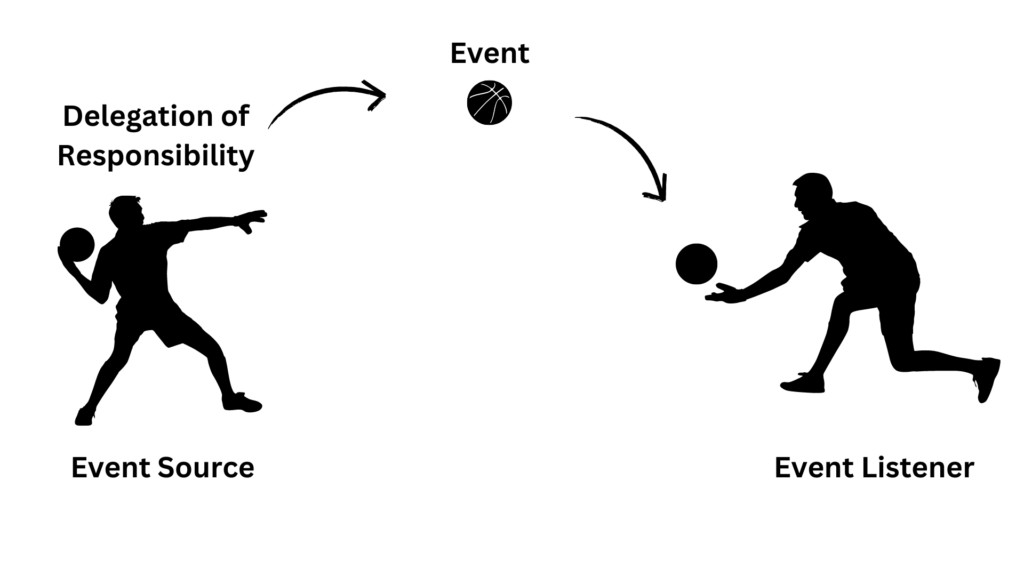
- The Event Delegation Model contains two entities
- Source:
- It is an Object on which an event occurs
- Button is the example of source
- Listener:
- It is known asan event handler
- Responsible for generating a response to the event
- button.addActionListener(al); is the example of listener
- Source:
- So what is the example of “Event Delegation Model”:
- If there is a Button, that button would contain two object states
- Unclicked State
- Clicked State
- If the button gets pressed, then some event may occur
11. What are Adapter classes in Java?
- It simplifies the process of event handling
- Provides an empty implementation of all the methods in an event listener interface
- Defines a new class to act as an event listener by extending one of the adapter classes and implementing only those methods that you want to use in your code.
- Different adapter classes in Java?
- WindowAdapter
- KeyAdapter
- MouseAdapter
- MouseMotionAdapter
- The MouseMotionAdapter class is used to draw real-time shapes based on your mouse motions (clicks and directions).
PROJECT-4. Create a GUI project using MouseMotionAdapter class to draw shapes using clicks and motion of the mouse.

public class SampleClass extends MouseMotionAdapter {
	JFrame f;

	public static void main(String[] args) {
		new SampleClass();
	}

	SampleClass() {
		f = new JFrame("Mouse Motion Adapter");

		// Register frame with some listener
		f.addMouseMotionListener(this);

		f.setSize(300, 300);
		f.setLayout(null);
		f.setVisible(true);

		f.setDefaultCloseOperation(JFrame.EXIT_ON_CLOSE);

	}

	//this method is always called whenever we drag the mouse
	public void mouseDragged(MouseEvent e) {
		Graphics g = f.getGraphics();
		g.setColor(Color.RED);
		g.fillRect(e.getX(), e.getY(), 5, 5);
	}

}
Thanks and Regards..
The lecture on awt/swing was fantastic sir . also, the lecture on file handling gave good insight of the topic . thanks for the session sir .
Thank you so much for your kind words! I’m glad to hear that you enjoyed the lectures on AWT/Swing and file handling. Your feedback is greatly appreciated and encourages me to continue providing insightful and engaging sessions.
Woah! I’m really digging the template/theme of this blog. It’s simple, yet effective. A lot of times it’s very hard to get that “perfect balance” between user friendliness and appearance. I must say you have done a fantastic job with this. Also, the blog loads super fast for me on Opera. Outstanding Blog!